How to protect the WordPress…
Richard Clarke: If you spend more time on coffee than on IT security, you will be…
Any commodity in this world is needed not only for you. If you own one or another valuable thing, then there will always be an attacker who try to take possession of this property, or at least use it, secretly from you.
The above applies fully to Internet sites. The more complex a site is, the more value it is to you and to potential hijackers and hackers. An inexperienced reader may ask a question: what is the value of my WordPress site if there are a dozen articles posted there? The answer is beyond the scope of this publication, but let’s just say that your site may need a malicious user to send spam messages advertising some dubious services.
In this article we will look at just one aspect of website security. We will tell you how to protect your WordPress site from hacking by guessing the administrator password. Why WordPress? Simply because this content management system is one of the most popular. As for other similar systems, you should act there by analogy with the WordPress system.
Note that the task of protecting the administrative panel is especially relevant only for various CMS. What about frameworks like Laravel or Yii? Certainly, we could protect the administrative resources of projects designed on the framework also. But these systems have obvious advantages over CMS, we are talking about built-in security tools, for example, protection against cross-site request forgery. Well, landing page and business card site do not have an admin panel at all, so there is nothing to defend there.
The one of main problem of such CMS like WordPress is that the standard package does not include protection against brute-forcing the administrator password. At the very least, it would not hurt the developers to limit the number of password attempts. This is why cybercriminals have created an entire industry of hacking, and rest assured that if the webmaster does not take any action to prevent hacking, the result will be dire. Special robots made by cybercriminals will sooner or later pick up the administrator’s login and password, even if this password is relatively complex. This is why you should take steps to prevent brute-force attacks on your site’s admin panel.
It is best to contact a programmer to protect the site, who will add the appropriate code to the WordPress theme. But, if there is a need to save money, you can put a ready-made free plugin with the required function. Here’s what we recommend:
- limit the number of attempts to enter a password for a certain period of time;
- prohibit short and simple passwords;
- prohibit the use of well-known words and transliterations of well-known words in passwords;
- equip the password entry form with a Turing test (CAPTCHA);
- require mandatory change of the password periodically, for example, once every 6 months.
However, all of the above measures require significant efforts on the part of the programmer and webmaster, and any work has its own cost. It is much easier, and, most importantly, cheaper, to protect the site’s admin panel by introducing a “white” list of IP addresses. This method is called “restricting access by IP”.
This method is based on the fact that all site administrators and managers use the administrative panel from the same computers and devices, as a rule. These devices are connected to the Internet via ISP networks, each of which has a limited list of IP subnets. As a result, authorized site personnel visit administrative resources from IP addresses located in a specific list of subnets. This list is rarely longer than 10 lines, and often it is generally one subnet if the Internet provider is a small company.
Here we will not go into technical details, and if you is not familiar with the theories, then we recommend you to simply perform the appropriate manipulations mechanically, without delving into the theory. You can do it!
All you need to do is add a few lines of code to two files, and these files have the same name “.htaccess”. The period in the file name means that the file is not visible to usual folder view commands. In addition, this is the name of the file the server will work with. One of the two files is located in the root folder of the site, the second is in the “/wp-admin” folder. Moreover, if there is no such file in this folder, it must be created. As for the ".htaccess" file in the root of the site, it must be there, otherwise the site will not work correctly.
When editing the “.htaccess” file, you need to take precautions, since almost any mistake will cause the site to stop working. Before performing the operation, make sure you have a backup copy of the site and its database.
It is best way to fix the contents of the files by connecting an FTP client to the hosting server where the site is located. You can, of course, use the file editor installed in the hosting panel. But this method is less secure.
The procedure for correcting files is as follows:
- Create four folders on the local PC for backing up and processing “.htaccess” files: “admin_save_area”, “admin_work_area”, “root_save_area”, “root_work_area”.
-
Connect to the hosting server using FTP or SFTP. Make the current root folder of the site.
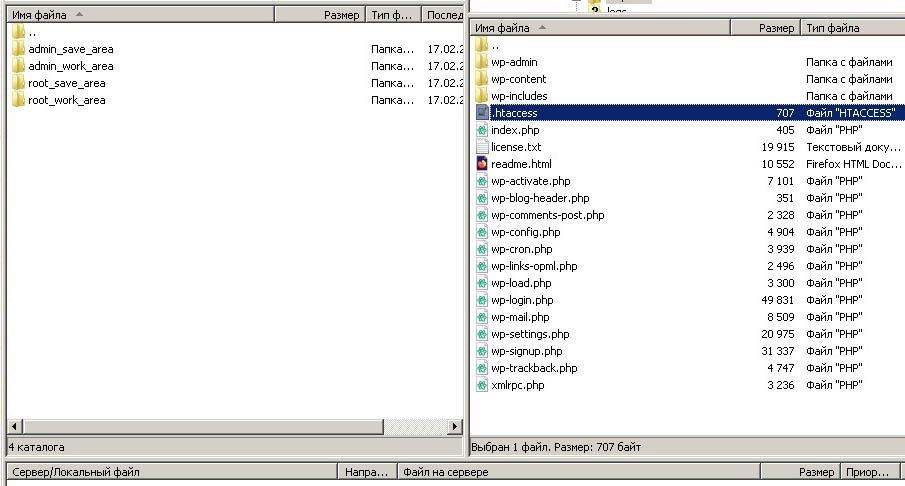
- Copy the “.htaccess” file one by one from the site root on the server into two folders - “root_save_area” and “root_work_area”.
- Copy the “.htaccess” file from the “/wp-admin” folder one by one to two folders - “admin_save_area”, “admin_work_area”.
- Edit files in the “root_work_area” and “admin_work_area” folders (see below for what to edit).
- Upload files from the “root_work_area” and “admin_work_area” folders to the server, to the root folder and to the “/wp-admin” folder, respectively.
- Check the functioning of the site. If the site does not work, return to step 3. If, after repeated attempts, nothing happens at all, then it is best to upload files to the server from the folders “admin_save_area”, “root_save_area” and contact a professional webmaster.
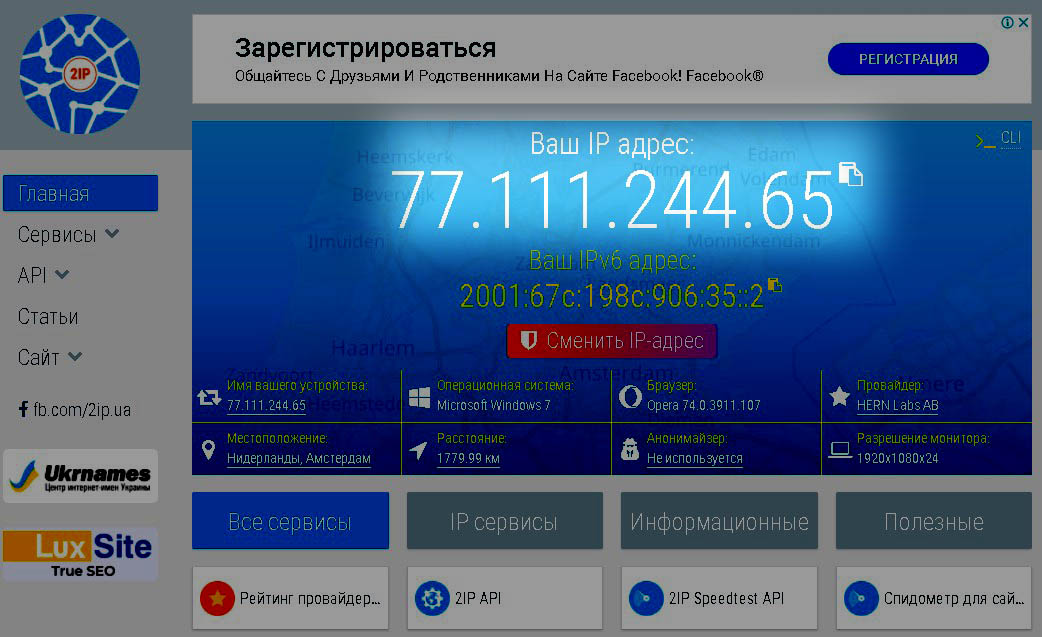
Now let’s talk about what kind of code you need to implement into our files. This code will declare permission to visit the admin panel from a specific group of IP addresses. Which address or group of addresses should be included in the list of allowed addresses and/or subnets? This address is easy to find out using any service for determining the external IP address, for example, using the site 2ip.me. We open this site and see our external IP address:
It is essential that the link with the service for determining the external IP should be opened not by the webmaster, but by the one who needs to open access. For example, if the webmaster Sergey wants to open access to the admin panel for the operator Vladimir. So Vladimir should open the link 2ip.me bit not Sergey. When Vladimir opened the link, he must tell his IP-address to Sergey, in the form of numbers or in a screenshot, it doesn’t matter anymore.
Now that we know the address that should be added to the list of allowed IP addresses, we can start generating the code. Our experience shows that it is better to open not one address, but a subnet of at least 256 addresses. This is because many ISPs have their external IP address constantly changing within a subnet. Therefore, if we open a subnet, and not one address, then the number of adjustments will be significantly reduced. On the other hand, we will not cause much damage to security.
So, we are faced with the task of allowing access to the admin panel of the site from all IP addresses, starting with the address "77.111.244.0" and ending with the address "77.111.244.255". Here’s the code to add to the “.htaccess” file located at the root of the site:
Order Deny,Allow
Deny from all
Allow from 77.111.244.0/24
Now let’s discuss the file "/wp-admin/.htaccess". The code block in this file should be supplemented with an exception for special requests such as AJAX. A discussion of this technology is beyond the scope of this article, so just place this code there:
Order allow,deny
Allow from all
Satisfy any

Order Deny,Allow
Deny from all
Allow from 77.111.244.0/24
So, we have denied access to the admin panel of the site for all addresses, except for those that belong to the same subnet. But what if we need to open many subnets? The answer is simple: use multiple Allow statements, one for each of the required subnets.
Now, hopefully, your site is reliably protected from admin password guessing. Of course, the above method does not provide a 100 % guarantee of the site’s security. Therefore, let us give you an advice: do not neglect other methods of protection, some of which are described at the beginning of this article.


